
Throw it in Reverse! (Reverse layering, that is.)
This site includes affiliate links. If you purchase from these links you will not pay more for the product, but I may earn a small commission which helps defray the costs of keeping the site running. I am also a participant in the Amazon Services LLC Associates Program, an affiliate advertising program designed to provide a means for me to earn commissions by linking to Amazon.com and affiliated sites. I appreciate your support!
My adorable granddaughter has recently been introduced to solid foods – an adventure that has been great fun for her, but one that can make a not-so-adorable mess…


To minimize cleanup for Mom & Dad, I made her this placemat, which is almost as sweet as she is. It’s easy to wipe off and can even be run under the faucet when more food ends up on her than in her!

The base of the placemat is a dollar store chopping mat. But no self-respecting, Silhouette-loving grandma would be satisfied with a plain old placemat, now would she? Certainly not! So I took a look around the Silhouette Design Store, grabbed some vinyl and started playing.

Adhesive vinyl is NOT food-safe, so I knew the design would have to go on the back of the placemat and the image would have to be layered sticky-side up. But how? The answer – reverse layering!
Reverse layering is exactly what the name implies. The vinyl is layered in reverse, with the sticky side UP. It does take a bit of concentration to wrap your mind around it (at least it did for me!), but with a little time and patience you too can master this technique.
Reverse Layering a Vinyl Decal
(Note: All screenshots are from Silhouette Studio Version 4)
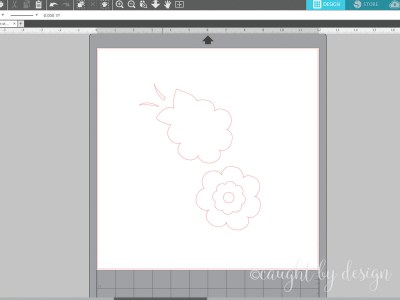
Step 1: Choose a design
With reverse layering, less really IS more – at least until you’ve had some practice. The first placemat I made turned out cute but the design had several layers and lots of tiny pieces, which made it quite a challenge to assemble. For this tutorial, I chose Design #59566 from the Silhouette Design Store. The flower includes multiple colors but the pieces are relatively large and there are only two small bits (the veins of the leaves) to deal with.

The file also includes a solid background layer which makes the design more aesthetically pleasing when viewed from the back. The finished size is approximately 3.5” square (perfect for my 11”x14” chopping mat) but feel free to resize as needed.
Step 2 (optional): Add an overlay
As an added layer of protection, I wanted to cover my completed design with a clear vinyl laminate (clear contact paper would work too). I chose a margin of 1/4” to allow plenty of room to “seal” the edges.
Select the design and ungroup either by hitting SHIFT+CTRL/CMD+G on the keyboard or by choosing Object>Ungroup.


I find it helpful to fill my design with color at this point.

Select the background layer. Open the Offset panel and choose “Offset” with rounded corners and a distance of 0.25”. (Note: If you manually enter “0.25” rather than using the UP arrow to adjust the default offset distance, hit “Enter” when you are done, rather than “Apply”. Otherwise the change may not take effect.)

Step 3: Mirror & Cut
For the design to turn out right when layered, you must first MIRROR the image. Once this is done, you can separate each color layer and proceed to cutting on the Silhouette. (Always remember to test cut first!)

Weed the vinyl as you normally would.

Now before we proceed to the next step, if you’re the type who likes living dangerously (or design alignment isn’t that crucial) feel free to use transfer tape only on the background piece and layer the remaining pieces by hand (without transfer tape), somewhat like putting together a sticker puzzle. It CAN be done, and in a few cases, might actually be quicker. (This is exactly what I did on the airplane design shown below – EXCEPT for the name. No way was I going to place all those individual letters by hand!) Just beware of air bubbles and stretching or wrinkling the vinyl. Not a fan of sticker puzzles? Grab a roll of transfer tape and let’s move on!
Step 4: Layer the design onto transfer tape
Cut one piece of transfer tape that’s large enough to cover your entire design and apply it to whichever piece is going to be on the back of your design when it is adhered to the placemat (not including the clear overlay). In this example, the green vinyl is the back of the design. Apply additional transfer tape to each of the other design elements.
Ok, here’s where it’s going to get tricky, but remember – PATIENCE is the key!
Take your background layer and secure it to your work surface using painters tape or place it on your Silhouette cutting mat. The transfer tape will be on the bottom and the sticky side of the vinyl will be on top.

Remember – we will now be thinking of this design in REVERSE, so take the layer that will go on top of the background piece and apply another piece of transfer tape over the top. At this point, your adhesive vinyl will be sandwiched in between two pieces of transfer tape. Burnish well to remove any air bubbles.
![]()
Peel off the original piece of transfer tape (which was on the non-sticky side). The non-sticky side of the vinyl will now be exposed and the remaining piece of transfer tape will be covering the adhesive side of the vinyl. (Tip: Mark your transfer tape in some way before you apply it, so you know which piece should be removed.)

Align this piece with the bottom layer, burnish, and remove the transfer tape. The two pieces of vinyl are now layered, with the adhesive side up on both pieces.

Repeat for each layer.

Step 5: Apply design to placemat
Once all your layers are in place, adhere the design to the placemat, burnish, and remove the transfer tape.
Step 6: Apply the clear overlay
 Since the overlay is made of clear laminate and alignment isn’t critical, I applied it as my final step. Alternatively, it could be used in the very first piece of the layering process (rather than the background layer). The overlay here is actually one piece of clear laminate that covers both the flower design and the name.
And…voilá! You have just completed a reverse layered design.

What other clear surfaces can you think of that this technique might work for? Leave me a comment below or visit me over on my Facebook page. You know I always enjoy hearing from you!
Until next time,

This post may contain affiliate advertising. This means that if you click on a link in the post, I may make a commission based on your purchase. The price you pay for the product or service is not higher, and the commissions I earn help keep Caught by Design online. Thanks for your support!

Lycia is a lifelong crafter whose goal is to help others find value, confidence, and joy in whatever they create. She geeks out on using technology to supercharge craft projects with Silhouette Studio, Design Space, Glowforge, sublimation, etc.! Lycia teaches these skills and more through online tutorials and videos as well as in-person classes at both the local and national levels.
I was wondering if the vinyl would look the same from underneath. Thank you for the tutorial! I want to do a glass cutting board.
Hi Beth! Yes, most vinyl is the same color on both sides and I’ve put it on the reverse side of cutting boards many times. The main difference is that 631 is usually a matte finish on top and glossy on the adhesive side. Thanks for commenting!
So sweet!!! Thanks so much for sharing another great technique!!!!
My pleasure. The placemats were so much fun to make!!!
Nicely done!!
Thank you :).