
Using Pattern Fills in Silhouette Studio
This site includes affiliate links. If you purchase from these links you will not pay more for the product, but I may earn a small commission which helps defray the costs of keeping the site running. I am also a participant in the Amazon Services LLC Associates Program, an affiliate advertising program designed to provide a means for me to earn commissions by linking to Amazon.com and affiliated sites. I appreciate your support!
If you’ve been using Silhouette Studio for any length of time, you’re probably familiar with the Fill Color and Line Color options. But did you know that you can also fill shapes and text with patterns? The Fill Pattern option can be used for a variety of different things – creating printable designs, making your own patterned paper, previewing how patterned vinyl will look before it’s actually cut, and more. Let me show you how it’s done!

When to Use Pattern Fills
Printable Designs
I use Silhouette Studio for almost all my graphic design projects. One particular example was my daughter’s wedding invitations. She wanted a gold foil look for some of the text but at the time I didn’t have a foiling machine and needed to figure out an alternative. Fill pattern to the rescue!

This t-shirt I made for my grandson also includes a pattern fill. The “8” is simply a font filled with a checkerboard pattern. The entire design was created in Silhouette Studio, printed on Jet-Pro Sofstretch Transfer Paper, and heat-pressed to the shirt.

Patterned Paper
I love making cards (especially Lori Whitlock designs!) but don’t always have the right colors or patterns of paper on hand. Pattern fills are an easy way to get exactly what I want.

And with the help of my Canon TS9251C printer, I can print pages large enough to make coordinating envelopes!


Previewing Patterned Vinyl
One of my favorite sources for patterned vinyl is Sparkleberry Ink. The prints are so beautiful and I don’t want to waste even an inch of them. But often, the pattern looks MUCH different when cut. With the help of pattern fills, I can easily preview how something will look in a particular pattern BEFORE it’s cut.

and more…
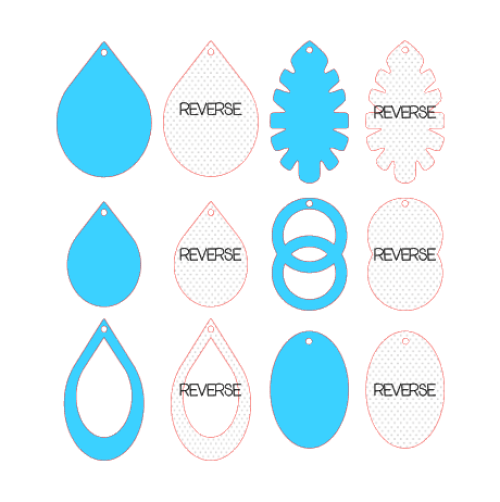
Pattern fills can even be useful when designing cut files. I’ve used pattern fills when I’m designing earrings so I can tell at a glance which images have been mirrored.
How to Create Pattern Fills in Silhouette Studio
So how does the Fill Pattern option actually work? Silhouette Studio comes with a few pre-loaded patterns and you can purchase many more from the Silhouette Design Store. In Designer Edition and above, you even can import your own custom patterns into your pattern library.
Purchasing Patterns from the Silhouette Design Store
Patterns can be purchased from the Silhouette Design Store just like any other design file. Once downloaded, the new patterns can be found in the Patterns folder of your Cloud library in Silhouette Studio Version 4.1 or in the Patterns folder of your consolidated library in Version 4.2.

Creating a Custom Pattern
Any digital image can be used as a custom pattern. Digital patterns can be found on the internet from a variety of sources, both as free downloads or purchased graphics. My favorite is digital scrapbook paper that automatically comes in a 12 in x 12 in size, such as this Hummingbird Pack from Creative Market.

Digital photos can also be used to create a custom pattern, such as for this Sparkleberry print. For best results, place the item to be photographed on a flat surface, such as the floor or a table, and take the photo directly overhead, keeping the image in proportion. For example, if you are photographing a 12 in x 12 in piece of vinyl, you will need to make sure the image appears as a square in the photo.

To create the image to be used for the custom pattern, delete any unwanted parts of the photo using image editing software. If you have Business Edition of Silhouette Studio, use either the Knife Tool or the Crop Tool to delete the unwanted parts, then save the image as a JPEG. If scale is important, such as with a Sparkleberry print, resize the image to 12 in x 12 in before saving.

Importing Custom Patterns
Silhouette Studio Designer Edition and above allows you to import your own custom patterns into the pattern library. To import a custom pattern, navigate to where the image is saved on your computer, then simply click on the image and drag it into your pattern library. The pattern will then appear in both the Patterns folder in the Library and the Patterns section of the Fill panel. (Note: if you don’t immediately see the thumbnail in the Patterns section, try closing the Fill panel and re-opening it.)


Filling Shapes or Text with a Pattern
The Fill Pattern option can be used just like the Fill Color option.
- Select the shape or text to be filled.
- Click on the icon that looks like an artist’s palette (3rd icon down on the right-hand side of your screen) to open the Fill panel.
- At the top of the Fill panel, click on the 3rd tab on the right to open the Fill Pattern panel.
- Scroll down through the Pattern panel until you see the pattern you want to use and click on the thumbnail. The shape will then be filled with the selected pattern.
- Alternatively, you can select a pattern first and then draw a shape or type some text. The shape/text will be automatically filled with the selected pattern as you draw or type.

Once you have filled your shape with a pattern, you can alter the pattern in several ways. Directly under the Pattern panel, you’ll see the transparency slider. Clicking on the arrow next to Advanced Options will allow you to mirror, change the aspect ratio, rotate, scale, or pan the pattern as desired.


Even though the Basic version of Silhouette Studio does not allow the import of custom patterns, you can still fill a shape with a digital image by using the Crop tool. Open the digital image on your Design Page, place the shape you want to fill on top of the digital image, select both, and choose Object>Modify>Crop. Even in higher versions of Studio, I use this method to preview how patterned vinyl will look when cut in order to maintain the exact scale of the pattern.


One last tip
When filling multiple shapes with the same pattern, you may notice that the scale of the pattern is different, depending on the size of the shape. To create a consistent scale among shapes of varying size, select all the shapes you want to fill and then choose Make Compound Path BEFORE you fill the shapes with a pattern.


Using the Fill Pattern option can be a lot of fun and an easy way to stretch your creative capabilities as well as your digital and physical resources. Ready to give it a try? Let me know what you think by leaving a comment below or visiting me over on Facebook. I’m always here to help and I love seeing what you create!
Until next time,

This post may contain affiliate advertising. This means that if you click on a link in the post, I may make a commission based on your purchase. The price you pay for the product or service is not higher, and the commissions I earn help keep Caught by Design online. Thanks for your support!

Lycia is a lifelong crafter whose goal is to help others find value, confidence, and joy in whatever they create. She geeks out on using technology to supercharge craft projects with Silhouette Studio, Design Space, Glowforge, sublimation, etc.! Lycia teaches these skills and more through online tutorials and videos as well as in-person classes at both the local and national levels.
Hi Lycia,
Just found your blog and so happy I did. I have been trying to figure out if it’s better to use patterns and fill or to use a background paper and crop? I have the Business Edition (I am NOT a graphics designer, just liked the ability to export files that Business Edition offers) so I don’t know if that makes a difference or not. I keep my digital files on my hard drive and then open what I want to work with in Studio and go from there. Because of that I have always used background paper and cropped.
Thank you for your time and your sharing your knowledge.
Lori
Hi Lori! Thank you for the nice comment! It’s really a matter of personal preference whether you want to use a digital pattern to fill your shape or crop a background paper. The software will recognize the cropped shape in the same way as if you’d filled it with a pattern because digital background papers are also digital patterns. In fact, if you double-click on a pattern in your Silhouette Library without selecting a shape first, the pattern will open as a digital background paper. In my opinion, it’s faster to use the pattern fill option because that’s the workflow I use most often. I also import background papers to my Silhouette library and use them just like any other pattern fill. I hope this helps. Let me know if you have any more questions!
Thank you for your prompt and informative reply. It’s nice to know it’s more personal preference rather than one method being better than the other.
Again, thank you for your time. It’s appreciated!
Happy to help!
Hi, I’ve been trying to save patterns off the internet but when I actually try to use them with the fill function I get a bunch of small boxes of my pattern in the image. Have you had any experience with this issue. I’m not sure how to fix it. I want the full pattern in the image.
It sounds like the pattern you’re trying to use is too small or the dpi is too low. Make sure you’re downloading a full size image at 300dpi (12×12 or larger is best) and not a thumbnail.
Hi Lycia, somewhere among all the updates from version 3.8 to 4.2 the function of adding custom patterns from the internet became available for the basic edition. Thanks for the tutorial, I have always wondered how to get my pattern to remain the same size no matter the size of design. Now I don’t have to wonder any more.
Hi Lee! I believe you have discovered a bug in the software, so enjoy it while you can 😉 .Glad you found the tutorial helpful.
Great tutorial! Thanks so much for sharing! I especially LOVE the matching envelope. The card is darling, but when you add the coordinating envelope it makes it even more special. I love it! ❤️
I agree Michelle! It was one of those “accidentally creative” moments as I was about to make an envelope out of solid color cardstock and had the thought to print a matching one. Little things like that make me so happy – LOL! Thanks for commenting 🙂 .
I sure can use this. It’s been difficult to find a tutorial. You spelled it out perfectly.
Thank you!
Pam
Thank you so much for the nice comment Pam! I’m glad it helped.