
More DIY Faux Leather Earrings – and a FREE cut file!
This site includes affiliate links. If you purchase from these links you will not pay more for the product, but I may earn a small commission which helps defray the costs of keeping the site running. I am also a participant in the Amazon Services LLC Associates Program, an affiliate advertising program designed to provide a means for me to earn commissions by linking to Amazon.com and affiliated sites. I appreciate your support!
Surprise! As I mentioned in my last post, I just finished teaching a class on faux leather earrings at the All Things Silhouette Conference in Peachtree City, Georgia organized and hosted by Terri Johnson Creates. While I was at the conference, I discovered another source for faux leather. I’ve been playing with…I mean TESTING…it today and I just couldn’t wait to share more about it. And since I missed posting last week, I’ve got something special for you – a free earring cut file so you can try making some earrings of your own!

First, let me tell you where you can find some of this fabulous faux leather for yourself. Visit gaylesnest.com and search for “Marine Vinyl”. You’ll be amazed at the selection! Gayle sells the material in 12 inch x 9 inch sheets or 12 inch x 54 inch rolls and her shipping charges are very reasonable. I brought home quite a variety from ATS, so I’m sure you’ll be seeing more posts like this in the future!

The materials I used today were:
- Solid Dark Grey
- Solid Light Grey
- Solid White
- Solid Burgundy
- Specialty Camel Tooled
- Specialty Mahogany Tooled
- Specialty Black Glitter
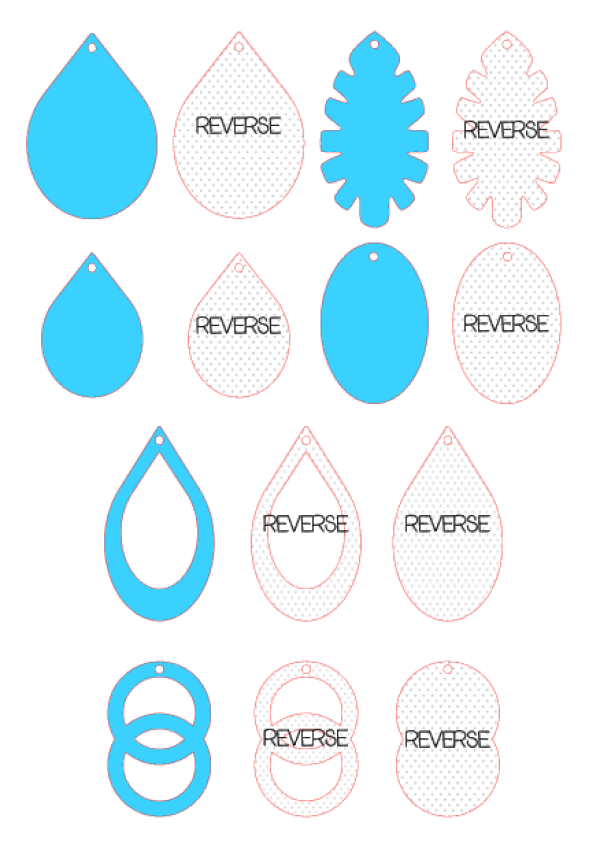
The free cut file includes 6 different designs. Some of the shapes can be mixed and matched and the two sizes of teardrops look great when layered together. I’ve even provided you with the shapes needed to cut a backing if you decide to make double-sided earrings.
Click here to download the free cut files:
Earring Freebie – Studio file
Earring Freebie – SVG file
Another fun thing to try is cutting a design from two different colors of material and combining the positive space of one color with the negative of another. For this pair, I combined the black glitter with the solid white. The backing was cut as a solid piece and I added adhesive with my handy-dandy Xyron sticker maker. (Note: The sticker maker is great for any earrings that are 1.5 inches or less in width. For wider earrings, use a Xyron Creative Station.)
Click here to see a demo of the Xyron Sticker Maker.


For tips on adjusting the size of the earrings without changing the size of the earwire hole, check out my other faux leather earring tutorial.
Each of the materials had a fabric-like backing and I had the best success when cutting on the reverse side. The marine vinyl has a bit of stretch to it, so make sure to adhere it to the mat securely, using painter’s tape if necessary. You may also find that you get better cuts if your design is not placed near the edges.


Any blade will work, but my preference is the Silhouette Premium Blade.

The cut settings I used were:
Solid – Dark Grey and Light Grey & Specialty Tooled
Blade: 10 Speed: 1 Force: 33 Passes: 3
Solid – White and Burgundy
Blade: 10 Speed: 1 Force: 33 Passes: 2
(for very detailed cuts with thin lines, 1 pass may be sufficient)
Specialty Black Glitter
Blade: 3 Speed: 5 Force: 33 Passes: 2
Once I added a set of Double J Earwires from Craft Chameleon, the earrings were complete. An earring card made with a design from the Silhouette Design Store (Silhouette Design Store ID #14053) provided an extra touch.


Faux leather earrings are a fun and relatively inexpensive project that provides instant gratification. For even more ideas, be sure to check out the earring designs available in the Silhouette Design Store.

Come share your projects over in my Facebook group. I’d love to see what you create!
Until next time,

This post may contain affiliate advertising. This means that if you click on a link in the post, I may make a commission based on your purchase. The price you pay for the product or service is not higher, and the commissions I earn help keep Caught by Design online. Thanks for your support!

Lycia is a lifelong crafter whose goal is to help others find value, confidence, and joy in whatever they create. She geeks out on using technology to supercharge craft projects with Silhouette Studio, Design Space, Glowforge, sublimation, etc.! Lycia teaches these skills and more through online tutorials and videos as well as in-person classes at both the local and national levels.
I’ve tried several times to download the SVG files for the faux leather earrings & the downloads do not work!!!!!!
Hi Bea! I just checked and the download is working for me (as well as for someone else that checked it for me) so it may be a problem with your browser. I’ll be happy to email it to you directly if you’d like!
hi. how do you glue the back and the front of the earring? can you cut if the two sides are glued together? Thank you!
Hello Anda! I run the pieces through my Xyron and then stick them together (https://caughtbydesign.com/2019/06/27/double-sided-faux-leather-earrings-using-xyron-sticker-maker/). You could use liquid adhesive instead, but it’s messier and tends to seep out around the edges. I would not suggest gluing two pieces together and then cutting because your material would be too thick.
Hi im wondering if we are allowed to sell the earrings that we make with your designs
They are free for you to use as you wish. Thank you very much for asking!
Hi Becky, Do you have a template for when you turn the tear drop style over and need to put the 2 holes at top to pinch together? Thanks much. Take care and be safe.
I don’t have a template like that but it would be simple to make in Studio. Another idea is to pinch the two sides together and punch the holes by hand with a small tool like a reamer. I love the one I got from Craft Chameleon! https://bit.ly/2VuMvfy (affiliate link)
How do you attach the backing to the earring? I read that the Xyron adhesive is water soluble. So does it hold the 2 layers and make the product durable? Do you have any other recommendations for adding backing? Thanks for the tutorial.
You’re welcome and thanks for commenting! Most of the time I use the Xyron permanent adhesive. If I’m making an earring that’s fabric on one side, I use HeatnBond. So far, all of the ones I’ve made have been very durable. Hope that helps!
Thank you for the designs. Could you share what blade you used to cut these?
You’re welcome! Thanks for reading the blog 🙂 . The premium blade is my favorite, so I’m pretty sure that’s what I used for these. The Autoblade and the regular ratchet blade work “almost” as well, but I simply prefer the premium blade. I show a comparison photo in one of my other posts about faux leather earrings. You can read it at https://caughtbydesign.com/2018/01/11/faux-leather-earring-tutorial/.
Goodmorning glad to have found your page … If using auto blade would u happen to know settings… TIA
Hello Gina! Thanks for visiting my site! The settings I shared in the post work with the AutoBlade. Are you asking if there is a pre-set in the software with those settings? If so, the answer is no. You’ll need to add a custom setting. You could also adjust the settings for Leatherette but be sure to revert back to the original settings (Blade=6, Speed=3, Force=33, Passes=2) before exiting the Send Panel so that they will be correct for Silhouette Leatherette Sheets. Thanks for commenting!
I cant get the free cut file to work?
Hi Hannah! I’m so sorry you’re having trouble! Can you tell me a little more? Is it a problem with the download or using the file in Studio?
If you have a newsletter please add me . Thank you!
Hi Becky! A newsletter is definitely on my goals list but I don’t have one yet. If you subscribe to the blog, you’ll be notified of all my new posts when they’re published. Thank you for asking!